目的:为什么要这样做 我的Mac只有256g,已经只剩下了60g,生物信息分析一个软件就是100多g,我把原来电脑里的anaconda文件夹删掉,在移动硬盘重新安装一遍anaconda,把默认的conda目录设置在移动硬盘里,然后改一下shell(bash_profile 或者 zshrc)的配置文件,以后什么虚拟环境啊依赖啊都用移动硬盘装,节约Mac硬盘空间。
一、anaconda安装在移动硬盘 0、把移动硬盘权限打开 1 2 chmod 771 /Volumes chmod 771 /Volumes/newSpace # /Volumes是Mac内的文件夹,newSpace是硬盘的名称。
1、安装 1 2 3 4 5 6 7 8 9 10 sh Anaconda3-5.3.1-MacOSX-x86_64.sh # 我的Mac中,有python2.7 和python3.7 和python3.9 这个anaconda是python3 的; # 看到提示“Press Enter to confirm the location, Press CTRL-C to cancel the installation or specify an alternate installation directory.”(“按回车键确认安装路径,按'CTRL-C' 取消安装或者指定安装目录。”)如果接受默认安装路径,则会显示“PREFIX=/home//anaconda<2 or 3>”并且继续安装。安装过程大约需要几分钟的时间。这里建议直接使用木人安装路径就可以了。 > >> /Volumes/newSpace/anaconda3 # 然后你会看到提示“Do you wish the installer to prepend the Anaconda install location to PATH in your /home//.bash_profile ?”(“你希望安装器添加Anaconda安装路径在/home/<user>/.bash_profile文件中吗?”),这里是说你希望自动添加环境变量到.bash_profile文件中,输入“yes ",就会自己帮你添加,如果输入”no" ,则需要你自己手动添加,这里直接“yes "就好。 # 最后会问你要不要安装 vscode,选择 no 不安装就行了。
2、修改环境变量 1 2 3 4 5 6 7 8 9 10 11 12 13 14 15 16 17 18 19 20 21 22 # 用bash的改 ~/.bash_profile; # 用zsh的改 ~/.zshrc ,我经常两个切换着用,所以都改。 vim ~/.bash_profile 或者 ~/.zshrc # 先注释掉旧的conda配置,然后添加如下内容: ------------------------------------------------- # added by Anaconda3 5.3.1 installer # >>> conda init >>> # !! Contents within this block are managed by 'conda init' !! __conda_setup="$(CONDA_REPORT_ERRORS=false '/Volumes/newSpace/anaconda3/bin/conda' shell.bash hook 2> /dev/null)" if [ $? -eq 0 ]; then \eval "$__conda_setup" else if [ -f "/Volumes/newSpace/anaconda3/etc/profile.d/conda.sh" ]; then . "/Volumes/newSpace/anaconda3/etc/profile.d/conda.sh" CONDA_CHANGEPS1=false conda activate base else \export PATH="/Volumes/newSpace/anaconda3/bin:$PATH" fi fi unset __conda_setup # <<< conda init <<<
1 2 3 # 配置文件生效 source ~/.bash_profile source ~/.zshrc
3、新建一个python2环境用来放生物信息工具 1 2 3 4 5 6 7 8 9 conda create -n biology_tools_py2 python=2 # 由于我的conda是python3版本的,实际上用到的这个python2.7是我的Mac中的,虚拟环境在 /Volumes/newSpace/anaconda3/envs/biology_tools_py2 # biology_tools_py2虚拟环境是python2.7的版本。 conda env list # 查看有哪些虚拟环境。 pip -V # 查看pip到底用的是Mac的pip,还是虚拟环境中的pip。 conda -V
4、激活环境 1 2 conda activate biology_tools_py2 # 激活环境 conda deactivate # 退出环境
二、虚拟环境下安装python库 先激活虚拟环境,再通过pip或者conda安装需要的库,我平时的习惯是用pip。
0、通过pip安装 用pip指定包到安装位置(这样的目的是以防多个pip的情况下,分不清下载进了哪个虚拟环境的site-packages中),pip在某个虚拟环境下载的包理论上会下载到那个虚拟环境下的 lib/pythonXXX/site-packages 之中,但是实际出现过错位,所以我建议指定好pip下载包的位置。pip也能用清华源加速,命令后加-i 清华源 即可。
1 pip install 【包名】 --target=/Volumes/newSpace/anaconda3/envs/biology_tools_py2/lib/python2.7/site-packages
1、通过conda安装 和pip一样,也是指定好安装位置。包存入我们移动硬盘中的虚拟环境中。
1 2 3 4 5 6 7 8 conda install 【包名】 # 这样conda安装的包默认去了 /Volumes/newSpace/anaconda3/pkgs # 查看已安装好的虚拟环境下都安装了那些python库 conda list # 虚拟环境对应的python版本的anaconda中的其他库一次性安装好,命令如下: conda install anaconda
2、改conda源为清华或者直接复原,打开终端的科学上网。 1 2 3 4 # 方案一: # 换回conda的默认源。 conda config --remove-key channels # 再打开科学上网。
1 2 3 4 5 6 7 8 9 10 11 12 13 14 15 16 17 18 19 # 方案二: # 添加清华或者阿里源(国内的源经常失效,要经常换。) vim ~/.condarc channels: - defaults show_channel_urls: true default_channels: - http://mirrors.aliyun.com/anaconda/pkgs/main - http://mirrors.aliyun.com/anaconda/pkgs/r - http://mirrors.aliyun.com/anaconda/pkgs/msys2 custom_channels: conda-forge: http://mirrors.aliyun.com/anaconda/cloud msys2: http://mirrors.aliyun.com/anaconda/cloud bioconda: http://mirrors.aliyun.com/anaconda/cloud menpo: http://mirrors.aliyun.com/anaconda/cloud pytorch: http://mirrors.aliyun.com/anaconda/cloud simpleitk: http://mirrors.aliyun.com/anaconda/cloud
1 2 # 查看conda配置 cat ~/.condarc
总的来说,用pip 会比conda 快很多,conda 在 Solving environment: 可能要等很久,用户体验不好。不是迫不得已我都首选用pip -i 配一个国内源。
三、补充:虚拟环境中可能遇到的问题 参考: https://blog.csdn.net/qq_40345954/article/details/114392892
先退出proxy代理
操作一次conda换源:
1 2 3 4 5 conda config --add channels http://mirrors.tuna.tsinghua.edu.cn/anaconda/pkgs/free/ conda config --add channels http://mirrors.tuna.tsinghua.edu.cn/anaconda/cloud/conda-forge conda config --add channels http://mirrors.tuna.tsinghua.edu.cn/anaconda/cloud/msys2/ conda config --add channels http://mirrors.tuna.tsinghua.edu.cn/anaconda/cloud/pytorch/ conda config --set show_channel_urls yes
再conda清除国内源:
1 conda config --remove-key channels
看看conda的配置
新建虚拟环境或者其他操作
1、shell版本的问题 无论shell是那个版本,~/.condarc配置文件搞定了, shell版本不影响conda的使用,zsh还是bash都一样。
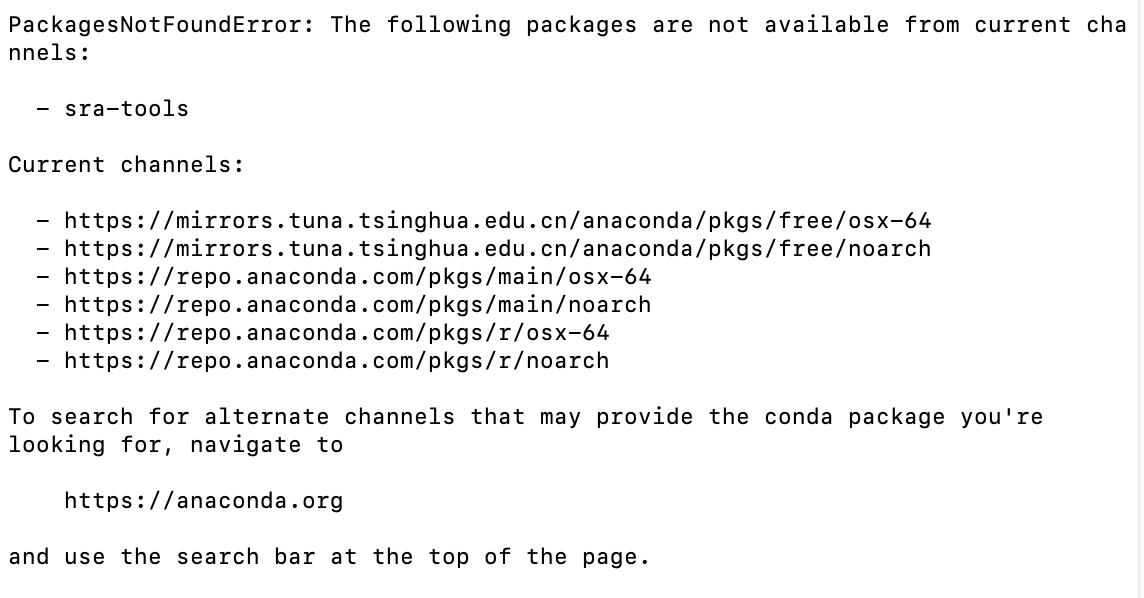
2、PackagesNotFoundError: The following packages are not available from current channels的解决办法
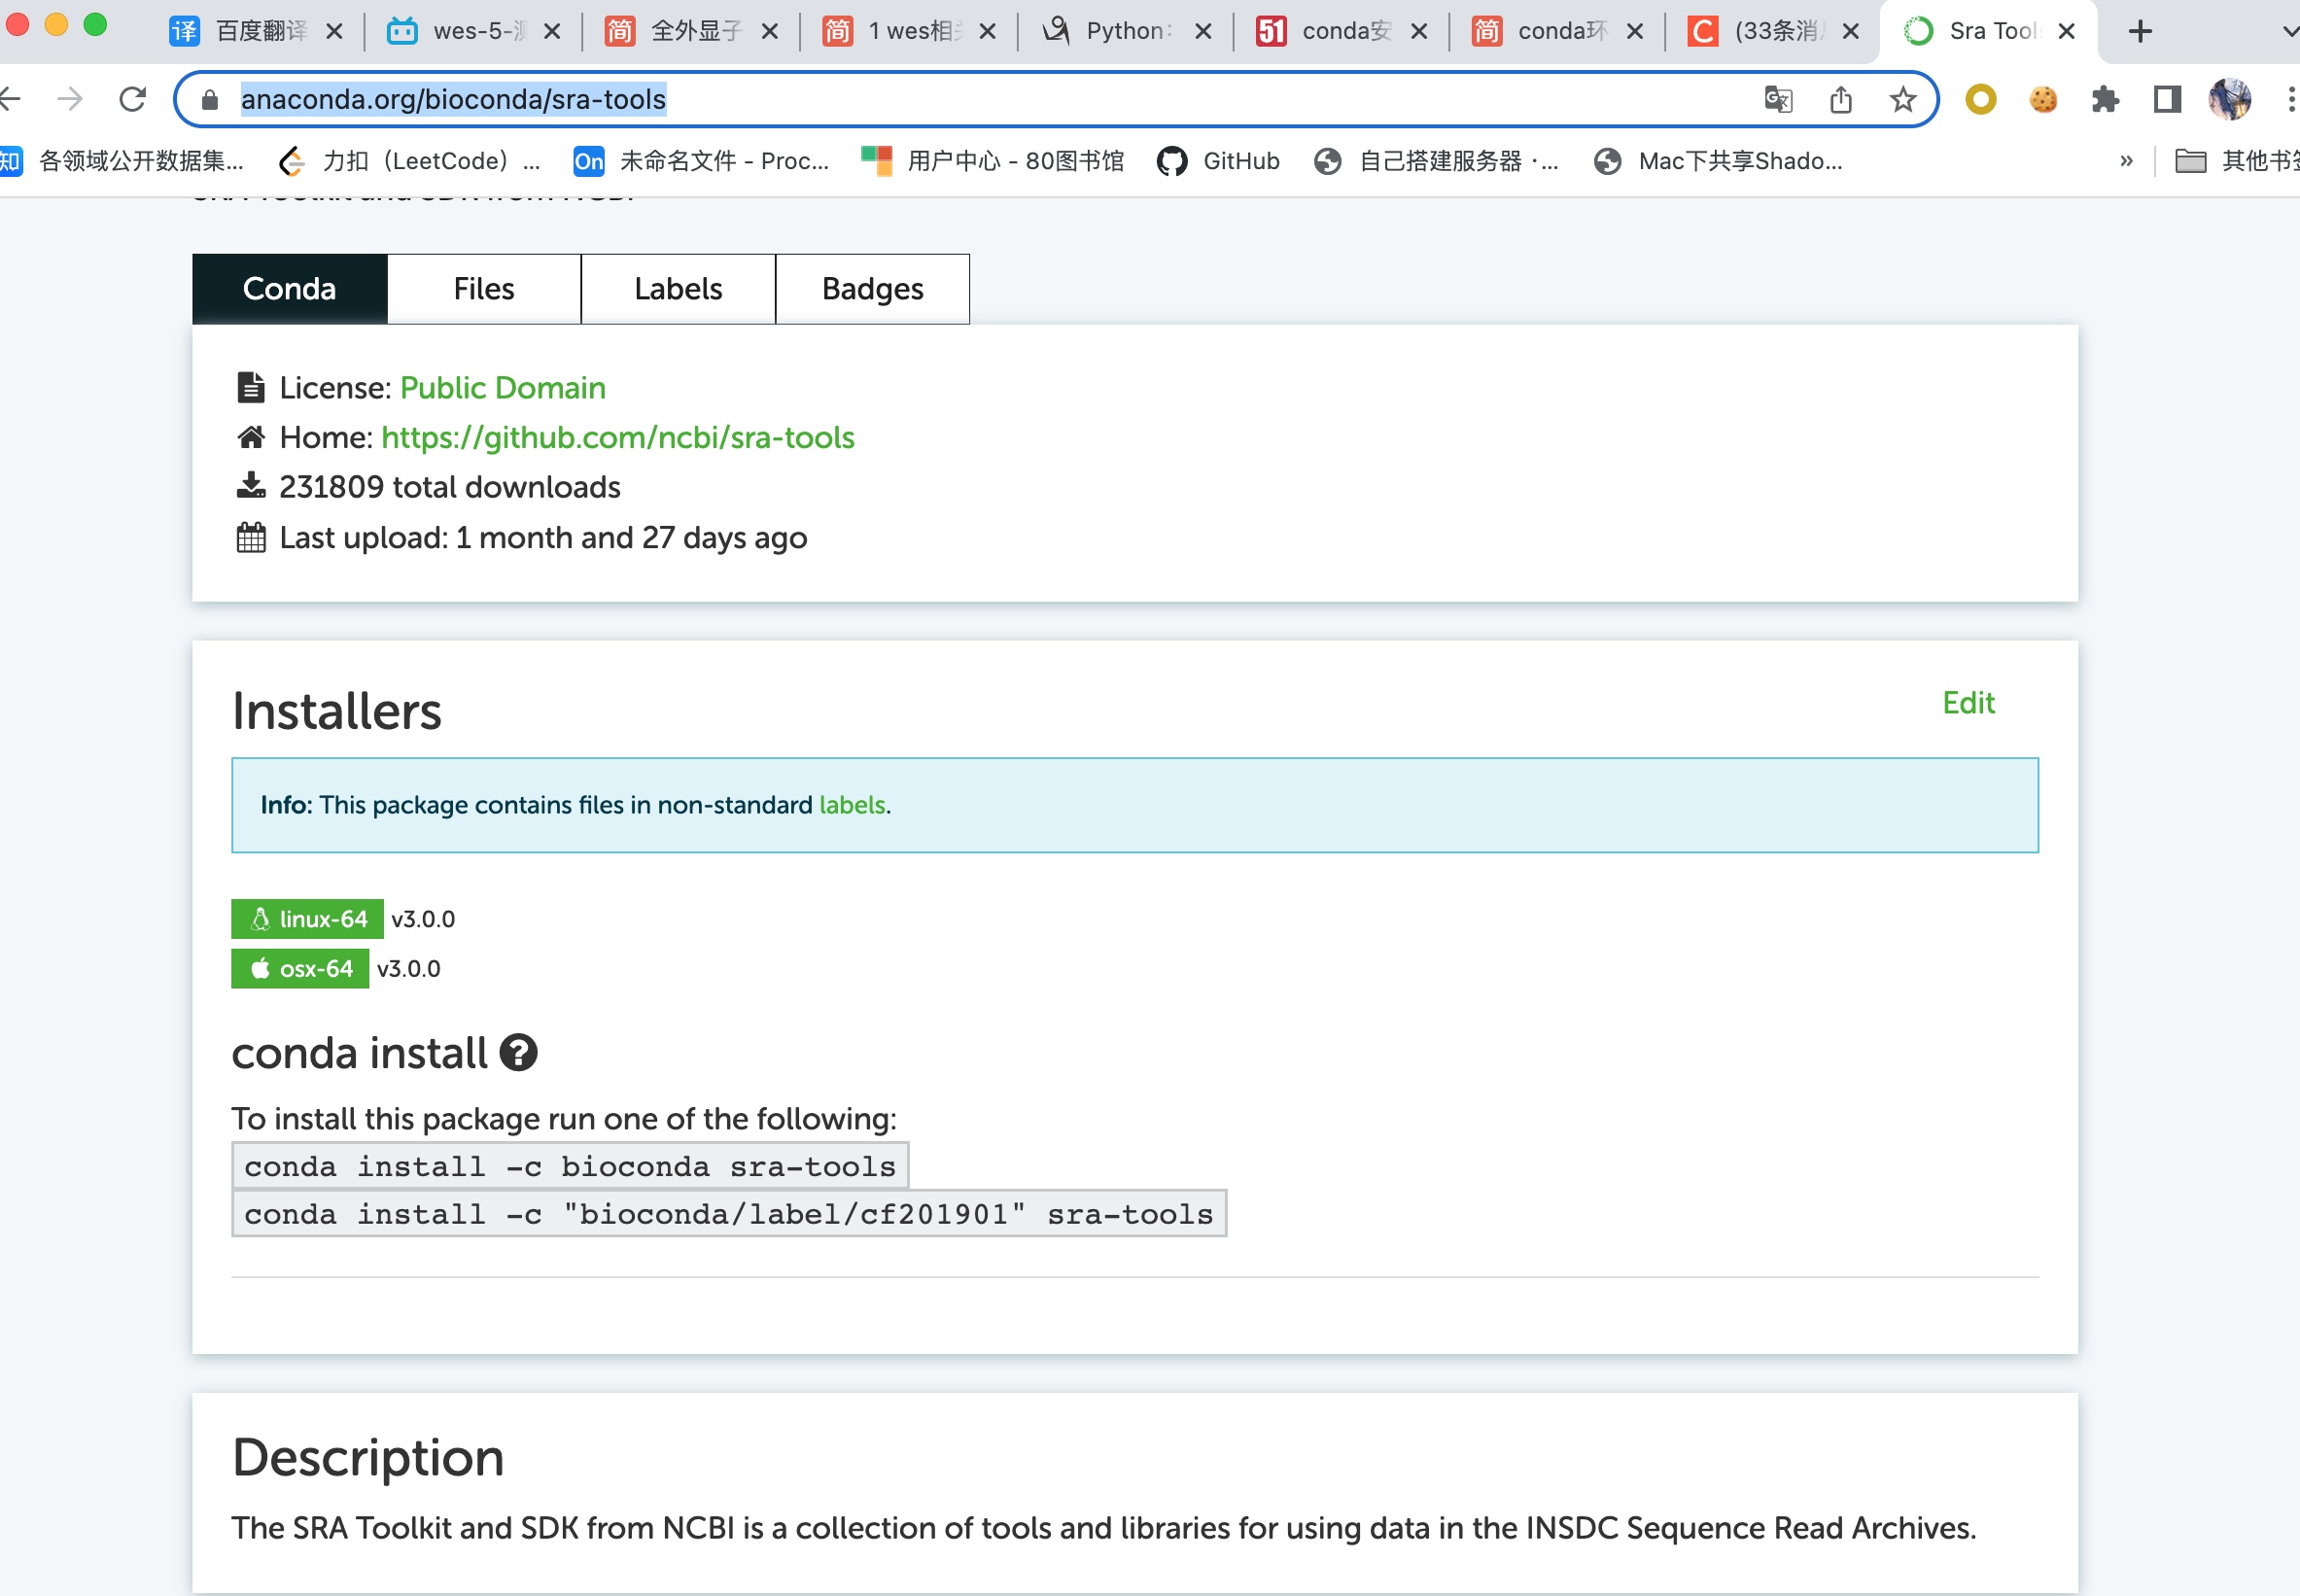
解决方法就是 去 https://anaconda.org/ 官网,搜索这个包,然后输入网址下方任意解决方案即可;

