MCP学习

一、一些基础概念

model context protocol (MCP)。

MCP Server

一个 MCP Server 相当于python中的一个模块,里面内置了一些函数。

截屏2025-04-23 16.26.23

每一个 mcp server 都有一个 GitHub仓库,都会教你如何下载和使用这个mcp server。

截屏2025-04-23 17.15.47

一个 MCP Server 只不是是一个程序而已,只不过它满足MCP规范。

MCP一般使用 python或者node编写。

对应启动程序一般是 uvx 或者 npx

截屏2025-04-23 21.14.20

MCP 交互流程

截屏2025-04-23 17.41.59

cline 就是 一个MCP Host 的角色。

MCP协议

截屏2025-04-27 21.46.30

MCP 模型上下文协议说的就是 MCP Host 和 MCP server 沟通的专用 json 格式规范而已。至于MCP Host 如何 和 大模型沟通,不属于 MCP协议的范畴。

cline 等等 很多 MCP Host 工具 都有各自 和 大模型交互的方法,这个看他们想法这么搞。 cline 用的是 XML 格式,也有一些家的产品如cherrystudio用的是openai家的 function Calling格式。

MCP 协议 就是 让模型来感知外部环境的协议(感知方法然后调用方法)。

截屏2025-04-27 21.53.06

vscode中下载cline

截屏2025-04-23 14.58.24

配置cline

因为我以前是在本地用vllm的ray分布式部署了 deepseek r1 模型,使用的是 模仿openai的格式【openai compatible】调用;

1
2
3
4
5
6
7
8
9
# 之前部署回顾
nohup vllm serve /model/deepseek-r1-70b-AWQ \
--tensor-parallel-size 2 \
--pipeline-parallel-size 2 \
--max-model-len 53520 \
--gpu-memory-utilization 0.8 \
--served-model-name deepseek-r1-70b-AWQ \
--api-key '**********' \
> ./logs/vllm.log 2>&1 &

所以用如下调用。

截屏2025-05-09 08.56.29

配置一下cline

截屏2025-04-23 15.50.16

选中文

截屏2025-04-23 15.57.55

截屏2025-04-23 16.10.02

注意上面的 context Window ,以token计算(1 token ≈ 4个英文字符/1.5个中文字符),每次对话输入(↓)和输出(↑)的token都会占用窗口容量,当进度条达到 128.0k 满额 时,模型响应速度下降,生成内容可能出现逻辑断层,新输入内容将被截断,历史上下文自动遗忘早期信息,可能触发错误提示。

测试

提问cline ,明天长春天气怎么样?

截屏2025-04-23 16.24.57

我们根据提示去上方 mcp server 市场下载。

但是推荐使用更具体一些的安装,这样对 安装位置和细节配置 自己心里有底。

截屏2025-04-23 16.42.18

在右边配置json格式的配置文件

1
2
3
4
5
6
7
8
9
10
11
12
13
14
15
16
#  以下例子 只是用来说明 概念,实际使用请看下文中 【使用MCP的例子】
{
"mcpServers": {
"weather":{
"timeout": 60,
"command": "uv",
"args": [
"--directory",
"/Users/chenyushao/mcp_server/weather",
"run",
"weather.py"
],
"transportType": "stdio"
}
}
}

weather 是名字,超时等待60s,使用的程序是uv,参数如上指定的下载位置,使用的主流沟通类型 stdio。

保存这个json文件以后,再问一遍一样的问题,它就会调用这个下载的 MCP Server 来处理了。

截屏2025-04-23 17.23.32

截屏2025-04-23 17.24.45

流程如下

截屏2025-04-23 17.41.59

二、如何使用别人写的 MCP Server

参考

https://docs.astral.sh/uv/

uv 的GitHub仓库

https://github.com/astral-sh/uv

去 MCP 市场

https://mcp.so/

https://mcpmarket.com/

https://smithery.ai/

MCP一般使用 python或者node编写。

对应启动程序一般是 uvx 或者 npx

截屏2025-04-23 21.14.20

介绍一下,uv 就是python中的包管理软件,uvx 可以用来直接启动python程序,uvx 是 uv tool run 的简称 。截屏2025-04-23 21.21.27

安装uv

从 uv 的GitHub 中参考,安装uv

1
2
3
4
5
6
7
8
9
10
11
12
13
14
15
16
17
18
19
20
21
22
23
24
25
26
27
28
29
30
31
32
33
34
35
36
37
38
39
40
41
42
43
44
45
curl -LsSf https://astral.sh/uv/install.sh | sh

echo $0 # Mac 查看自己用的是bash 还是 zsh。

# vim ~/.bash_profile 或者 ~/.zshrc 中添加 如下安装路径
export PATH="$HOME/.local/bin:$HOME/bin:/usr/local/bin:$PATH"

source ~/.bash_profile # 或者 ~/.zshrc

# 删除旧的 realpath Stub
sudo rm /usr/local/bin/realpath

# 安装并正确使用 Homebrew Coreutils
# 工具会被安装到 $(brew --prefix)/opt/coreutils/libexec/gnubin/
brew install coreutils

# 在 ~/.bash_profile 加入下面路径,可以使gnubin在环境变量中,直接使用ls而不用使用gls 这样带g 前缀的命令。
export PATH="/usr/local/opt/coreutils/libexec/gnubin:$PATH"
export PATH="$(brew --prefix)/opt/coreutils/libexec/gnubin:$PATH"

source ~/.bash_profile

# 检测是否成功。
which realpath
# 应输出:/usr/local/opt/coreutils/libexec/gnubin/realpath
realpath --version
# 应输出:GNU coreutils 的版本信息

# 重新测试牛牛叫。
rm -rf ~/.cache/uv
uv tool uninstall pycowsay
uv tool install pycowsay
uvx pycowsay 'hello world!'
-------------------------------------------------
------------
< hello world! >
------------
\ ^__^
\ (oo)\_______
(__)\ )\/\
||----w |
|| ||
-------------------------------------------------
# 在系统终端 OK 了以后,还要记得在 vscode 的终端里再运行一遍
source ~/.bash_profile

截屏2025-04-23 21.27.23

截屏2025-04-23 22.32.37

理解uv

当你执行 uv tool installuvx 时,uv 会在其专用目录下创建(或临时使用)一个隔离的 Python 虚拟环境,并将特定的 python 解释器及命令行入口点绑定到该环境中,从而保证工具运行时使用预期的解释器版本和依赖环境 Astral 文档

1、**pip 的工作方式 **

  • pip install 包名 会将包安装到当前活动的虚拟环境或全局环境中,依赖的解析与安装都在当前环境中完成。它并不创建新的隔离环境,也不负责管理 Python 解释器版本,也不生成可移植的锁文件。

2、 uv 的定位与优势

  • uv 提供了一个对标 pip 的命令集(如 uv pip install),可无缝迁移现有 pip 工作流,并在性能上实现 10–100× 的加速 CSDN博客GitHub
  • 与此同时,uv 自动为每个项目或工具创建并管理虚拟环境,支持 .python-version 锁定 Python 版本,还能生成通用锁文件 (uv.lock),确保跨平台解析一致 Astral 文档Astral 文档
  • 除了包管理,uv 还集成了脚本运行(uvx/uv tool run)、Python 版本管理(uv python install/uv python pin)、工作区支持等功能,几乎替代了 pip-toolsvirtualenvpyenvpipx 等多个工具 CSDN博客Astral: Next-gen Python tooling

3、持久化安装:uv tool install

  • 当执行 uv tool install <package> 时,uv 会在其全局缓存目录(通常位于 ~/.cache/uv/...)中为该工具创建一个独立的虚拟环境,并将工具的可执行脚本(如 pycowsay)放到 ~/.local/bin 下。

4、临时运行:uvx / uv tool run

  • uvx(等同于 uv tool run)则是在每次调用时,会在一个临时目录创建环境、安装依赖、执行命令,完成后再删除该环境,适合一次性脚本或测试场景。

结论

UV 可被视作“带隔离与锁定功能的增强版 pip”,在环境可复现性、版本管理、依赖解析速度上都有很大提升,但它并不等同于 Docker,也不提供 OS 级容器化能力。

在 Conda 环境中运行 uv 时,默认所用的 Python 版本与当前 Conda 环境无直接关系;若需共享或复用 Conda 环境的解释器,必须通过显式配置(如 --no-managed-python--python 参数或设置 VIRTUAL_ENV)来告知 uv 使用该环境。

使用MCP的例子

uvx系

使用 fetch 这个 MCP Server,它是用来抓取网页内容的;

从前面推荐的 MCP 市场 搜索fetch,如 https://mcp.so/

截屏2025-04-24 16.07.52

点击 Fetch,进入content,看见 配置建议 三大阵营 uvx、docker、pip。

截屏2025-04-24 21.40.06

截屏2025-04-24 21.44.14

1
2
3
4
5
6
7
8
{
"mcpServers": {
"fetch": {
"command": "/Users/chenyushao/.local/bin/uvx",
"args": ["mcp-server-fetch"]
}
}
}

vscode 的cline 插件一个经典报错:

spawn uvx ENOENT spawn uvx ENOENT

已经下载好了所有的包,但是vscode 中的cline 还是 提示 spawn uvx ENOENT spawn uvx ENOENT,VS Code 的进程里找不到 uvx 可执行文件,虽然在终端里跑 uvx 没问题,但从 GUI(Spotlight、Dock)直接启动 VS Code 时,它并不会加载你在 ~/.bash_profile~/.zshrc 里设置的 PATH,导致集成终端或扩展程序拿不到更新后的环境变量。

推荐粗暴解决方法:

直接json文件中指定 uvx 位置,which uvx 、which uv 找到路径,然后把上面的 uvx、uv 分别替换成刚刚找到的路径。

/Users/chenyushao/.local/bin/uvx

把配置填写到 MCP Server install 的 json 文件中,command+s/ctrl+s,然后可以在 install 界面中看见 这个小点点没有变绿,说明还没有被加载完成。

有时候,vscode 的 cline 插件没有识别到 MCP Server install 的 json 文件的东西,可能是下载超时,我们就应该复制MCP Server市场中的命令,去终端先执行一遍,类似

1
2
3
4
rm -rf ~/.cache/uv
uv tool uninstall mcp-server-fetch # 或其他出错的工具
# uv tool install mcp-server-fetch
uvx mcp-server-fetch

截屏2025-04-25 09.12.46

看见 这样不是卡住了,而是已经下载好了34个包,已经启动了。

ctrl+c 或者 / 退出,再去 cline 的 MCP Server installed 去 retry 一下。

截屏2025-04-25 10.24.32

可见 两个绿色坨坨。

再来个稍微复杂一点点的例子,看看这个

https://mcp.so/server/weather-mcp/odinggg?tab=content

同样是从 mcp 市场中搜一个 查询天气的 mcp server,它有一套构建指南,根据它的指导一步一步在本地建好,然后用cline 插件在vscode 中调用。

截屏2025-04-25 10.57.00

注册 openweather ,会发一个 API key 到我们的邮箱。

截屏2025-04-25 11.06.13

在cline 的instaled 的json 文件中写入:

1
2
3
4
5
6
7
8
9
10
11
12
13
14
15
16
17
18
19
20
{
"mcpServers": {
"fetch": {
"command": "/Users/chenyushao/.local/bin/uvx",
"args": ["mcp-server-fetch"]
},
"weather": {
"command": "/Users/chenyushao/.local/bin/uv",
"args": [
"--directory",
"/Users/chenyushao/mcp_server/weather-mcp",
"run",
"-m",
"weather_mcp_server.main",
"--api-key",
"4cc5540e55d86d33858c1fdff4fda354"
]
}
}
}

可见

截屏2025-04-25 11.10.09

直接问问题用就好了。
截屏2025-04-26 14.05.28

npx系

截屏2025-04-26 15.14.32

截屏2025-04-26 15.16.21

把这个在 MCP Server 的installed 的 json文件 中写入”mcp-server-hotnews”

1
2
3
4
5
6
7
8
9
10
11
{
"mcpServers": {
"mcp-server-hotnews": {
"command": "npx",
"args": [
"-y",
"@wopal/mcp-server-hotnews"
]
}
}
}

截屏2025-04-26 15.20.44

MCP Server 下载超时,就和uvx 中的做法一样,在终端先运行一下。

1
2
3
4
5
6
7
8
9
10
11
12
13
14
# 先确认一下 有没有npx。
node -v
npm -v
npx -v

# 运行
npx -y @wopal/mcp-server-hotnews

# 报证书验证错误
# npm ERR! code CERT_HAS_EXPIRED
# npm ERR! errno CERT_HAS_EXPIRED
# 使用官方推荐的新淘宝镜像
# npm config set registry https://registry.npmmirror.com
# npx -y @wopal/mcp-server-hotnews # 再运行。

截屏2025-04-26 15.39.32

腿粗以后再在 前文中的 json 文件中刷新。

当然了,npx 推荐换成 which npx查的绝对路径,以防找不着。
问了问题点 approve 就行。

截屏2025-04-26 15.56.35

截屏2025-04-26 15.58.06

截屏2025-04-26 15.58.47

截屏2025-04-26 16.01.30

三、自己写一个MCP Server

参考官方文档:

截屏2025-04-26 17.05.01

截屏2025-04-26 17.06.23

1、创建 MCP Server

build MCP Server,可以用 python、node 、java 、c# 等等 都可以的。搞MCP 协议 与语言无关。

我用python多一点,所以以 python为例子:

1
2
3
4
5
6
7
uv init weather # 初始化生成一个文件夹,文件夹内有一个.venv文件夹。
cd weather
uv venv
source .venv/bin/activate # 激活虚拟环境,
# 可以和 conda 的环境嵌套用,像这样(weather) (chen) MacBook...
# deactivate 可以退出这个虚拟环境,和conda一样的
uv add "mcp[cli]" httpx # 安装依赖"mcp[cli]" 和 httpx

uv 的环境 是和文件夹绑定的

进入 init 过的文件夹,然后 source 激活一下,就进入了此环境,deactivate 退出。

在项目目录中执行 uv inituv venv 时,uv 会自动在项目根目录下生成 .venv 文件夹(或通过 uv venv myenv 创建命名环境)。这个目录包含了 Python 解释器、依赖包及虚拟环境配置信息

1
2
3
# vscode 进入刚才 init 新建的文件夹
# 新建一个weather.py
vim weather.py
1
2
3
4
5
6
7
8
9
10
11
12
13
14
15
16
17
18
19
20
21
22
23
24
25
26
27
28
29
30
31
32
33
34
35
36
37
38
39
40
41
42
43
44
45
46
47
48
49
50
51
52
53
54
55
56
57
58
59
60
61
62
63
64
65
66
67
68
69
70
71
72
73
74
75
76
77
78
79
80
81
82
83
84
85
86
87
88
89
90
91
92
93
94
from typing import Any 
import httpx
from mcp.server.fastmcp import FastMCP

# 初始化一个 mcp server
mcp = FastMCP("weather",log_level="ERROR")

# Constants
NWS_API_BASE = "https://api.weather.gov"
USER_AGENT = "weather-app/1.0" # 在调用前面的 接口网址 的时候,说明我们是从 weather 这个 mcp server 来访问的。

async def make_nws_request(url: str) -> dict[str, Any] | None:
"""Make a request to the NWS API with proper error handling."""
headers = {
"User-Agent": USER_AGENT,
"Accept": "application/geo+json"
}
async with httpx.AsyncClient() as client:
try:
response = await client.get(url, headers=headers, timeout=30.0)
response.raise_for_status()
return response.json()
except Exception:
return None

def format_alert(feature: dict) -> str:
"""Format an alert feature into a readable string."""
props = feature["properties"]
return f"""
Event: {props.get('event', 'Unknown')}
Area: {props.get('areaDesc', 'Unknown')}
Severity: {props.get('severity', 'Unknown')}
Description: {props.get('description', 'No description available')}
Instructions: {props.get('instruction', 'No specific instructions provided')}
"""
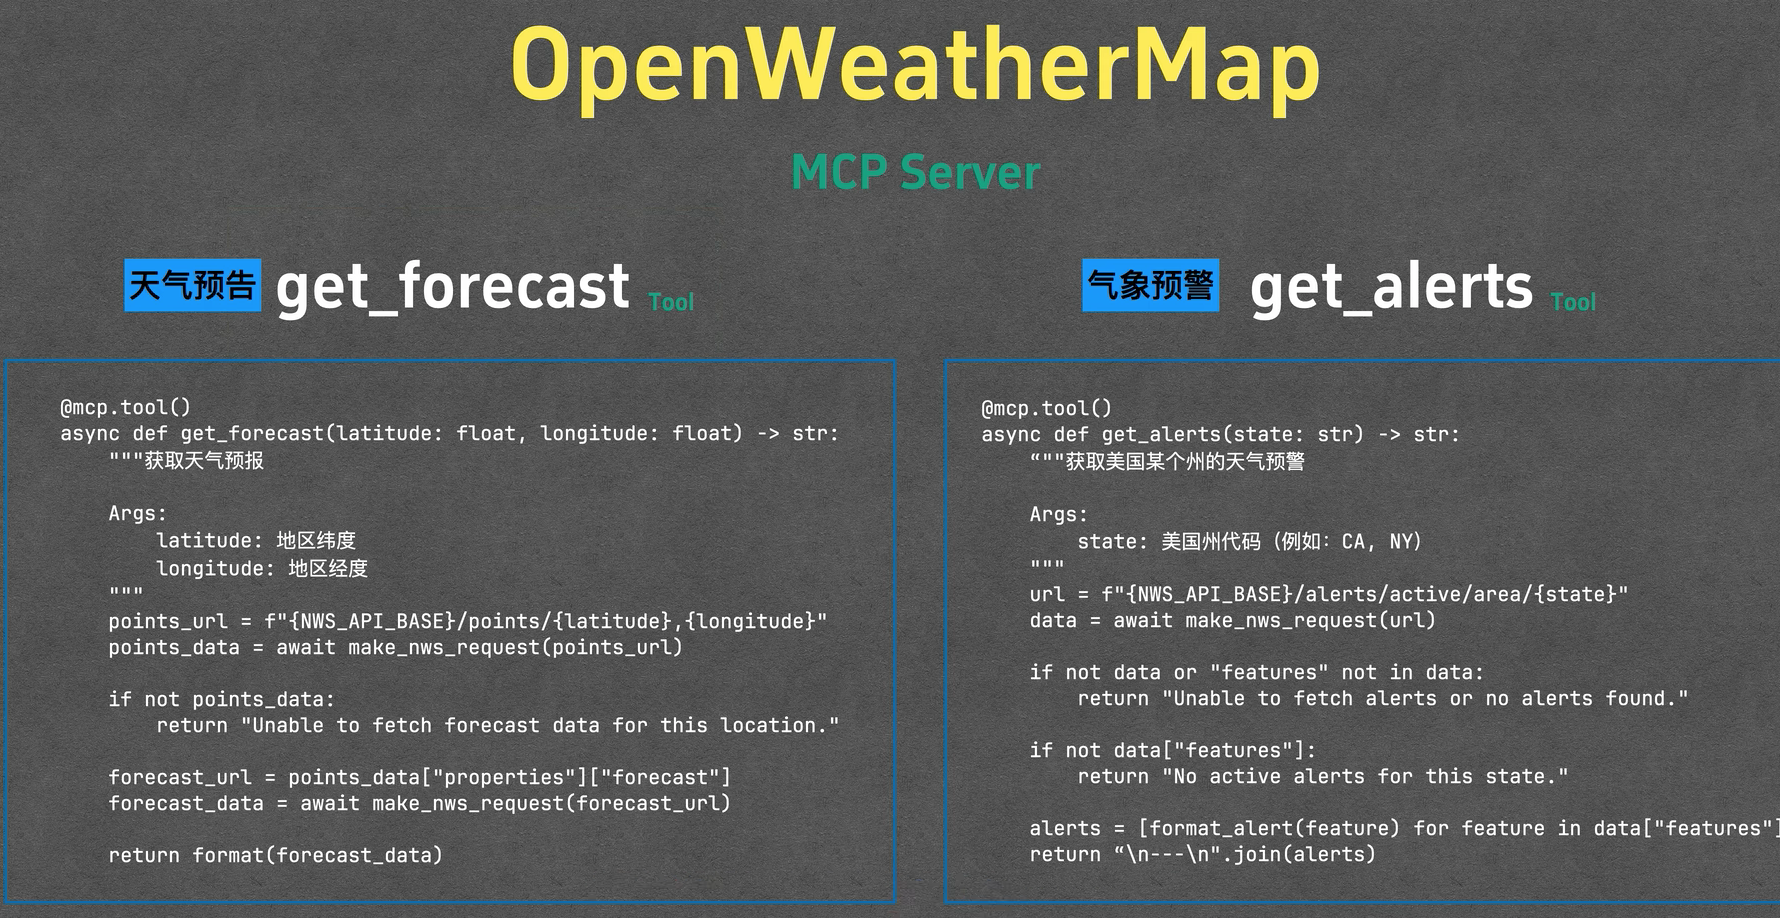
@mcp.tool()
async def get_alerts(state: str) -> str:
"""Get weather alerts for a US state.

Args:
state: Two-letter US state code (e.g. CA, NY)
"""
url = f"{NWS_API_BASE}/alerts/active/area/{state}"
data = await make_nws_request(url)

if not data or "features" not in data:
return "Unable to fetch alerts or no alerts found."

if not data["features"]:
return "No active alerts for this state."

alerts = [format_alert(feature) for feature in data["features"]]
return "\n---\n".join(alerts)

@mcp.tool()
async def get_forecast(latitude: float, longitude: float) -> str:
"""Get weather forecast for a location.

Args:
latitude: Latitude of the location
longitude: Longitude of the location
"""
# First get the forecast grid endpoint
points_url = f"{NWS_API_BASE}/points/{latitude},{longitude}"
points_data = await make_nws_request(points_url)

if not points_data:
return "Unable to fetch forecast data for this location."

# Get the forecast URL from the points response
forecast_url = points_data["properties"]["forecast"]
forecast_data = await make_nws_request(forecast_url)

if not forecast_data:
return "Unable to fetch detailed forecast."

# Format the periods into a readable forecast
periods = forecast_data["properties"]["periods"]
forecasts = []
for period in periods[:5]: # Only show next 5 periods
forecast = f"""
{period['name']}:
Temperature: {period['temperature']}°{period['temperatureUnit']}
Wind: {period['windSpeed']} {period['windDirection']}
Forecast: {period['detailedForecast']}
"""
forecasts.append(forecast)

return "\n---\n".join(forecasts)

if __name__ == "__main__":
# Initialize and run the server
mcp.run(transport='stdio') # 使用标准输入输出作为通信通道。

此时记得换一下 vscode 的python解释器,不然不会识别这些包。

截屏2025-04-26 18.04.30

@mcp.tool() 装饰器

@mcp.tool() 装饰器是为了把函数注册为 tool ,它实际上是来介绍这个函数,好让 MCP Host 知道 MCP Server 中有哪些 tool 函数可以被调用,MCP Host 之后再和 LLM 交流。

2、在MCP Host 中注册此MCP Server

1
2
3
4
5
6
7
8
9
10
11
12
13
{
"mcpServers": {
"weather": {
"command": "/Users/chenyushao/.local/bin/uv",
"args": [
"--directory",
"/Users/chenyushao/mcp_server/weather",
"run",
"weather.py"
]
}
}
}

截屏2025-04-26 22.33.31

前文中有介绍,这里不多说了,上图是直接使用的例子。

3、补充:MCP底层协议剖析

虽然这个 MCP Server 是我们写的,但是 实际上是这个MCP 库来完成的,这个MCP 库做了很多事情我们不得而知,就像 前面那个 装饰器 来注册tool,如果和 MCP Host 交流等等。

截屏2025-04-26 21.04.05

如果这个 MCP Server 是在终端中启动的,那我们可以直观的看见 它的输入与输出,但是 这个 MCP Server 是 cline 启动的,我们根本看不见中间发生了什么。

为了更加具体的了解 MCP Server 和 MCP Host 之间的输入输出,我们写一个脚本来记录这些输入输出,方便我们理解这个沟通过程。

目的是运行 python mcp_logger.py uv XXXX run xxx.py ,获取 uv XXXX run xxx.py 的输入和输出。截屏2025-04-26 21.12.21

1
2
3
4
5
6
7
8
9
10
11
12
13
14
15
16
17
18
19
20
21
22
23
24
25
26
27
28
29
30
31
32
33
34
35
36
37
38
39
40
41
42
43
44
45
46
47
48
49
50
51
52
53
54
55
56
57
58
59
60
61
62
63
64
65
66
67
68
69
70
71
72
73
74
75
76
77
78
79
80
81
82
83
84
85
86
87
88
89
90
91
92
93
94
95
96
97
98
99
100
101
102
103
104
105
106
107
108
109
110
111
112
113
114
115
116
117
118
119
120
121
122
123
124
125
126
127
128
129
130
131
132
133
134
135
136
137
138
139
140
141
142
143
144
145
146
147
148
149
150
151
152
153
154
155
156
157
158
159
160
161
162
163
164
165
166
167
168
169
170
171
172
173
174
175
176
177
178
179
180
181
182
183
184
185
186
187
188
189
190
191
192
193
194
195
196
197
198
199
200
201
202
203
204
205
206
207
208
209
210
211
212
213
214
215
216
217
218
219
220
221
222
223
224
225
226
227
228
229
230
231
232
233
234
235
236
237
238
239
240
241
242
vim mcp_logger.py
------------------------ mcp_logger.py -----------------------
#!/usr/bin/env python3

import sys
import subprocess
import threading
import argparse
import os

# --- Configuration ---
LOG_FILE = os.path.join(os.path.dirname(os.path.realpath(__file__)), "mcp_io.log")
# --- End Configuration ---

# --- Argument Parsing ---
parser = argparse.ArgumentParser(
description="Wrap a command, passing STDIN/STDOUT verbatim while logging them.",
usage="%(prog)s <command> [args...]"
)
# Capture the command and all subsequent arguments
parser.add_argument('command', nargs=argparse.REMAINDER,
help='The command and its arguments to execute.')

open(LOG_FILE, 'w', encoding='utf-8')

if len(sys.argv) == 1:
parser.print_help(sys.stderr)
sys.exit(1)

args = parser.parse_args()

if not args.command:
print("Error: No command provided.", file=sys.stderr)
parser.print_help(sys.stderr)
sys.exit(1)

target_command = args.command
# --- End Argument Parsing ---

# --- I/O Forwarding Functions ---
# These will run in separate threads

def forward_and_log_stdin(proxy_stdin, target_stdin, log_file):
"""Reads from proxy's stdin, logs it, writes to target's stdin."""
try:
while True:
# Read line by line from the script's actual stdin
line_bytes = proxy_stdin.readline()
if not line_bytes: # EOF reached
break

# Decode for logging (assuming UTF-8, adjust if needed)
try:
line_str = line_bytes.decode('utf-8')
except UnicodeDecodeError:
line_str = f"[Non-UTF8 data, {len(line_bytes)} bytes]\n" # Log representation

# Log with prefix
log_file.write(f"输入: {line_str}")
log_file.flush() # Ensure log is written promptly

# Write the original bytes to the target process's stdin
target_stdin.write(line_bytes)
target_stdin.flush() # Ensure target receives it promptly

except Exception as e:
# Log errors happening during forwarding
try:
log_file.write(f"!!! STDIN Forwarding Error: {e}\n")
log_file.flush()
except: pass # Avoid errors trying to log errors if log file is broken

finally:
# Important: Close the target's stdin when proxy's stdin closes
# This signals EOF to the target process (like test.sh's read loop)
try:
target_stdin.close()
log_file.write("--- STDIN stream closed to target ---\n")
log_file.flush()
except Exception as e:
try:
log_file.write(f"!!! Error closing target STDIN: {e}\n")
log_file.flush()
except: pass


def forward_and_log_stdout(target_stdout, proxy_stdout, log_file):
"""Reads from target's stdout, logs it, writes to proxy's stdout."""
try:
while True:
# Read line by line from the target process's stdout
line_bytes = target_stdout.readline()
if not line_bytes: # EOF reached (process exited or closed stdout)
break

# Decode for logging
try:
line_str = line_bytes.decode('utf-8')
except UnicodeDecodeError:
line_str = f"[Non-UTF8 data, {len(line_bytes)} bytes]\n"

# Log with prefix
log_file.write(f"输出: {line_str}")
log_file.flush()

# Write the original bytes to the script's actual stdout
proxy_stdout.write(line_bytes)
proxy_stdout.flush() # Ensure output is seen promptly

except Exception as e:
try:
log_file.write(f"!!! STDOUT Forwarding Error: {e}\n")
log_file.flush()
except: pass
finally:
try:
log_file.flush()
except: pass
# Don't close proxy_stdout (sys.stdout) here

# --- Main Execution ---
process = None
log_f = None
exit_code = 1 # Default exit code in case of early failure

try:
# Open log file in append mode ('a') for the threads
log_f = open(LOG_FILE, 'a', encoding='utf-8')

# Start the target process
# We use pipes for stdin/stdout
# We work with bytes (bufsize=0 for unbuffered binary, readline() still works)
# stderr=subprocess.PIPE could be added to capture stderr too if needed.
process = subprocess.Popen(
target_command,
stdin=subprocess.PIPE,
stdout=subprocess.PIPE,
stderr=subprocess.PIPE, # Capture stderr too, good practice
bufsize=0 # Use 0 for unbuffered binary I/O
)

# Pass binary streams to threads
stdin_thread = threading.Thread(
target=forward_and_log_stdin,
args=(sys.stdin.buffer, process.stdin, log_f),
daemon=True # Allows main thread to exit even if this is stuck (e.g., waiting on stdin) - reconsider if explicit join is needed
)

stdout_thread = threading.Thread(
target=forward_and_log_stdout,
args=(process.stdout, sys.stdout.buffer, log_f),
daemon=True
)

# Optional: Handle stderr similarly (log and pass through)
stderr_thread = threading.Thread(
target=forward_and_log_stdout, # Can reuse the function
args=(process.stderr, sys.stderr.buffer, log_f), # Pass stderr streams
# Add a different prefix in the function if needed, or modify function
# For now, it will log with "STDOUT:" prefix - might want to change function
# Let's modify the function slightly for this
daemon=True
)
# A slightly modified version for stderr logging
def forward_and_log_stderr(target_stderr, proxy_stderr, log_file):
"""Reads from target's stderr, logs it, writes to proxy's stderr."""
try:
while True:
line_bytes = target_stderr.readline()
if not line_bytes: break
try: line_str = line_bytes.decode('utf-8')
except UnicodeDecodeError: line_str = f"[Non-UTF8 data, {len(line_bytes)} bytes]\n"
log_file.write(f"STDERR: {line_str}") # Use STDERR prefix
log_file.flush()
proxy_stderr.write(line_bytes)
proxy_stderr.flush()
except Exception as e:
try:
log_file.write(f"!!! STDERR Forwarding Error: {e}\n")
log_file.flush()
except: pass
finally:
try:
log_file.flush()
except: pass

stderr_thread = threading.Thread(
target=forward_and_log_stderr,
args=(process.stderr, sys.stderr.buffer, log_f),
daemon=True
)


# Start the forwarding threads
stdin_thread.start()
stdout_thread.start()
stderr_thread.start() # Start stderr thread too

# Wait for the target process to complete
process.wait()
exit_code = process.returncode

# Wait briefly for I/O threads to finish flushing last messages
# Since they are daemons, they might exit abruptly with the main thread.
# Joining them ensures cleaner shutdown and logging.
# We need to make sure the pipes are closed so the reads terminate.
# process.wait() ensures target process is dead, pipes should close naturally.
stdin_thread.join(timeout=1.0) # Add timeout in case thread hangs
stdout_thread.join(timeout=1.0)
stderr_thread.join(timeout=1.0)


except Exception as e:
print(f"MCP Logger Error: {e}", file=sys.stderr)
# Try to log the error too
if log_f and not log_f.closed:
try:
log_f.write(f"!!! MCP Logger Main Error: {e}\n")
log_f.flush()
except: pass # Ignore errors during final logging attempt
exit_code = 1 # Indicate logger failure

finally:
# Ensure the process is terminated if it's still running (e.g., if logger crashed)
if process and process.poll() is None:
try:
process.terminate()
process.wait(timeout=1.0) # Give it a moment to terminate
except: pass # Ignore errors during cleanup
if process.poll() is None: # Still running?
try: process.kill() # Force kill
except: pass # Ignore kill errors

# Final log message
if log_f and not log_f.closed:
try:
log_f.close()
except: pass # Ignore errors during final logging attempt

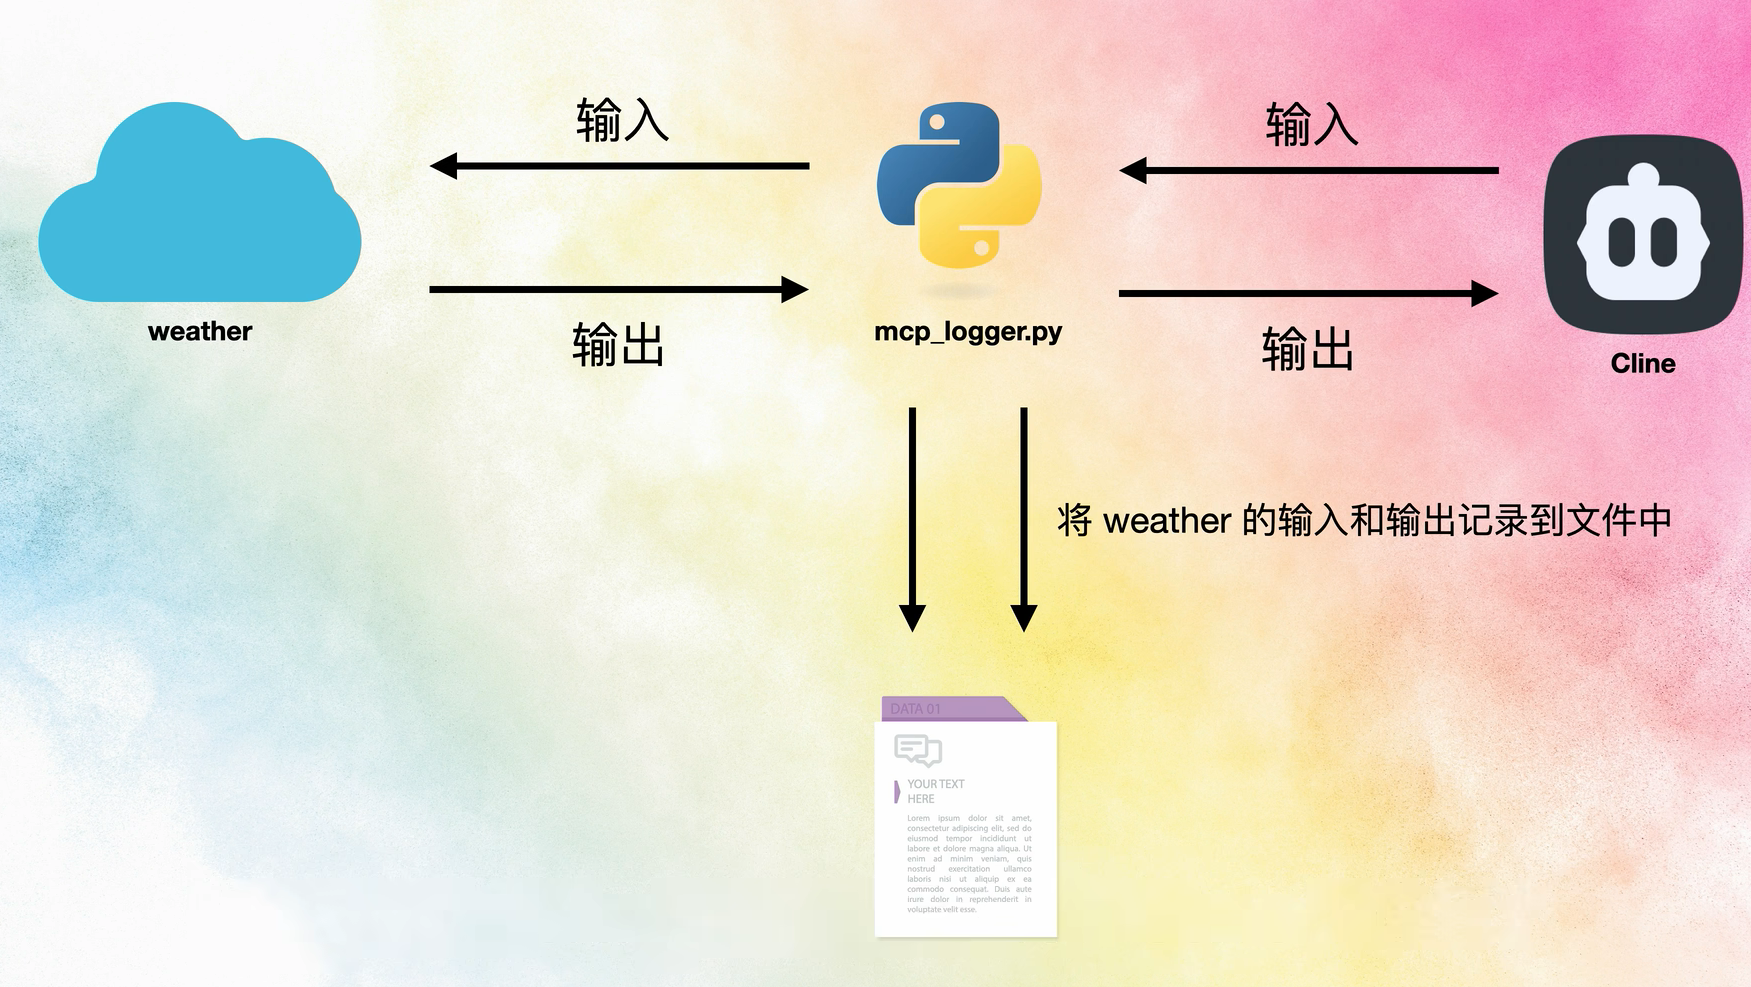
# Exit with the target process's exit code
sys.exit(exit_code)
------------------------ mcp_logger.py -----------------------
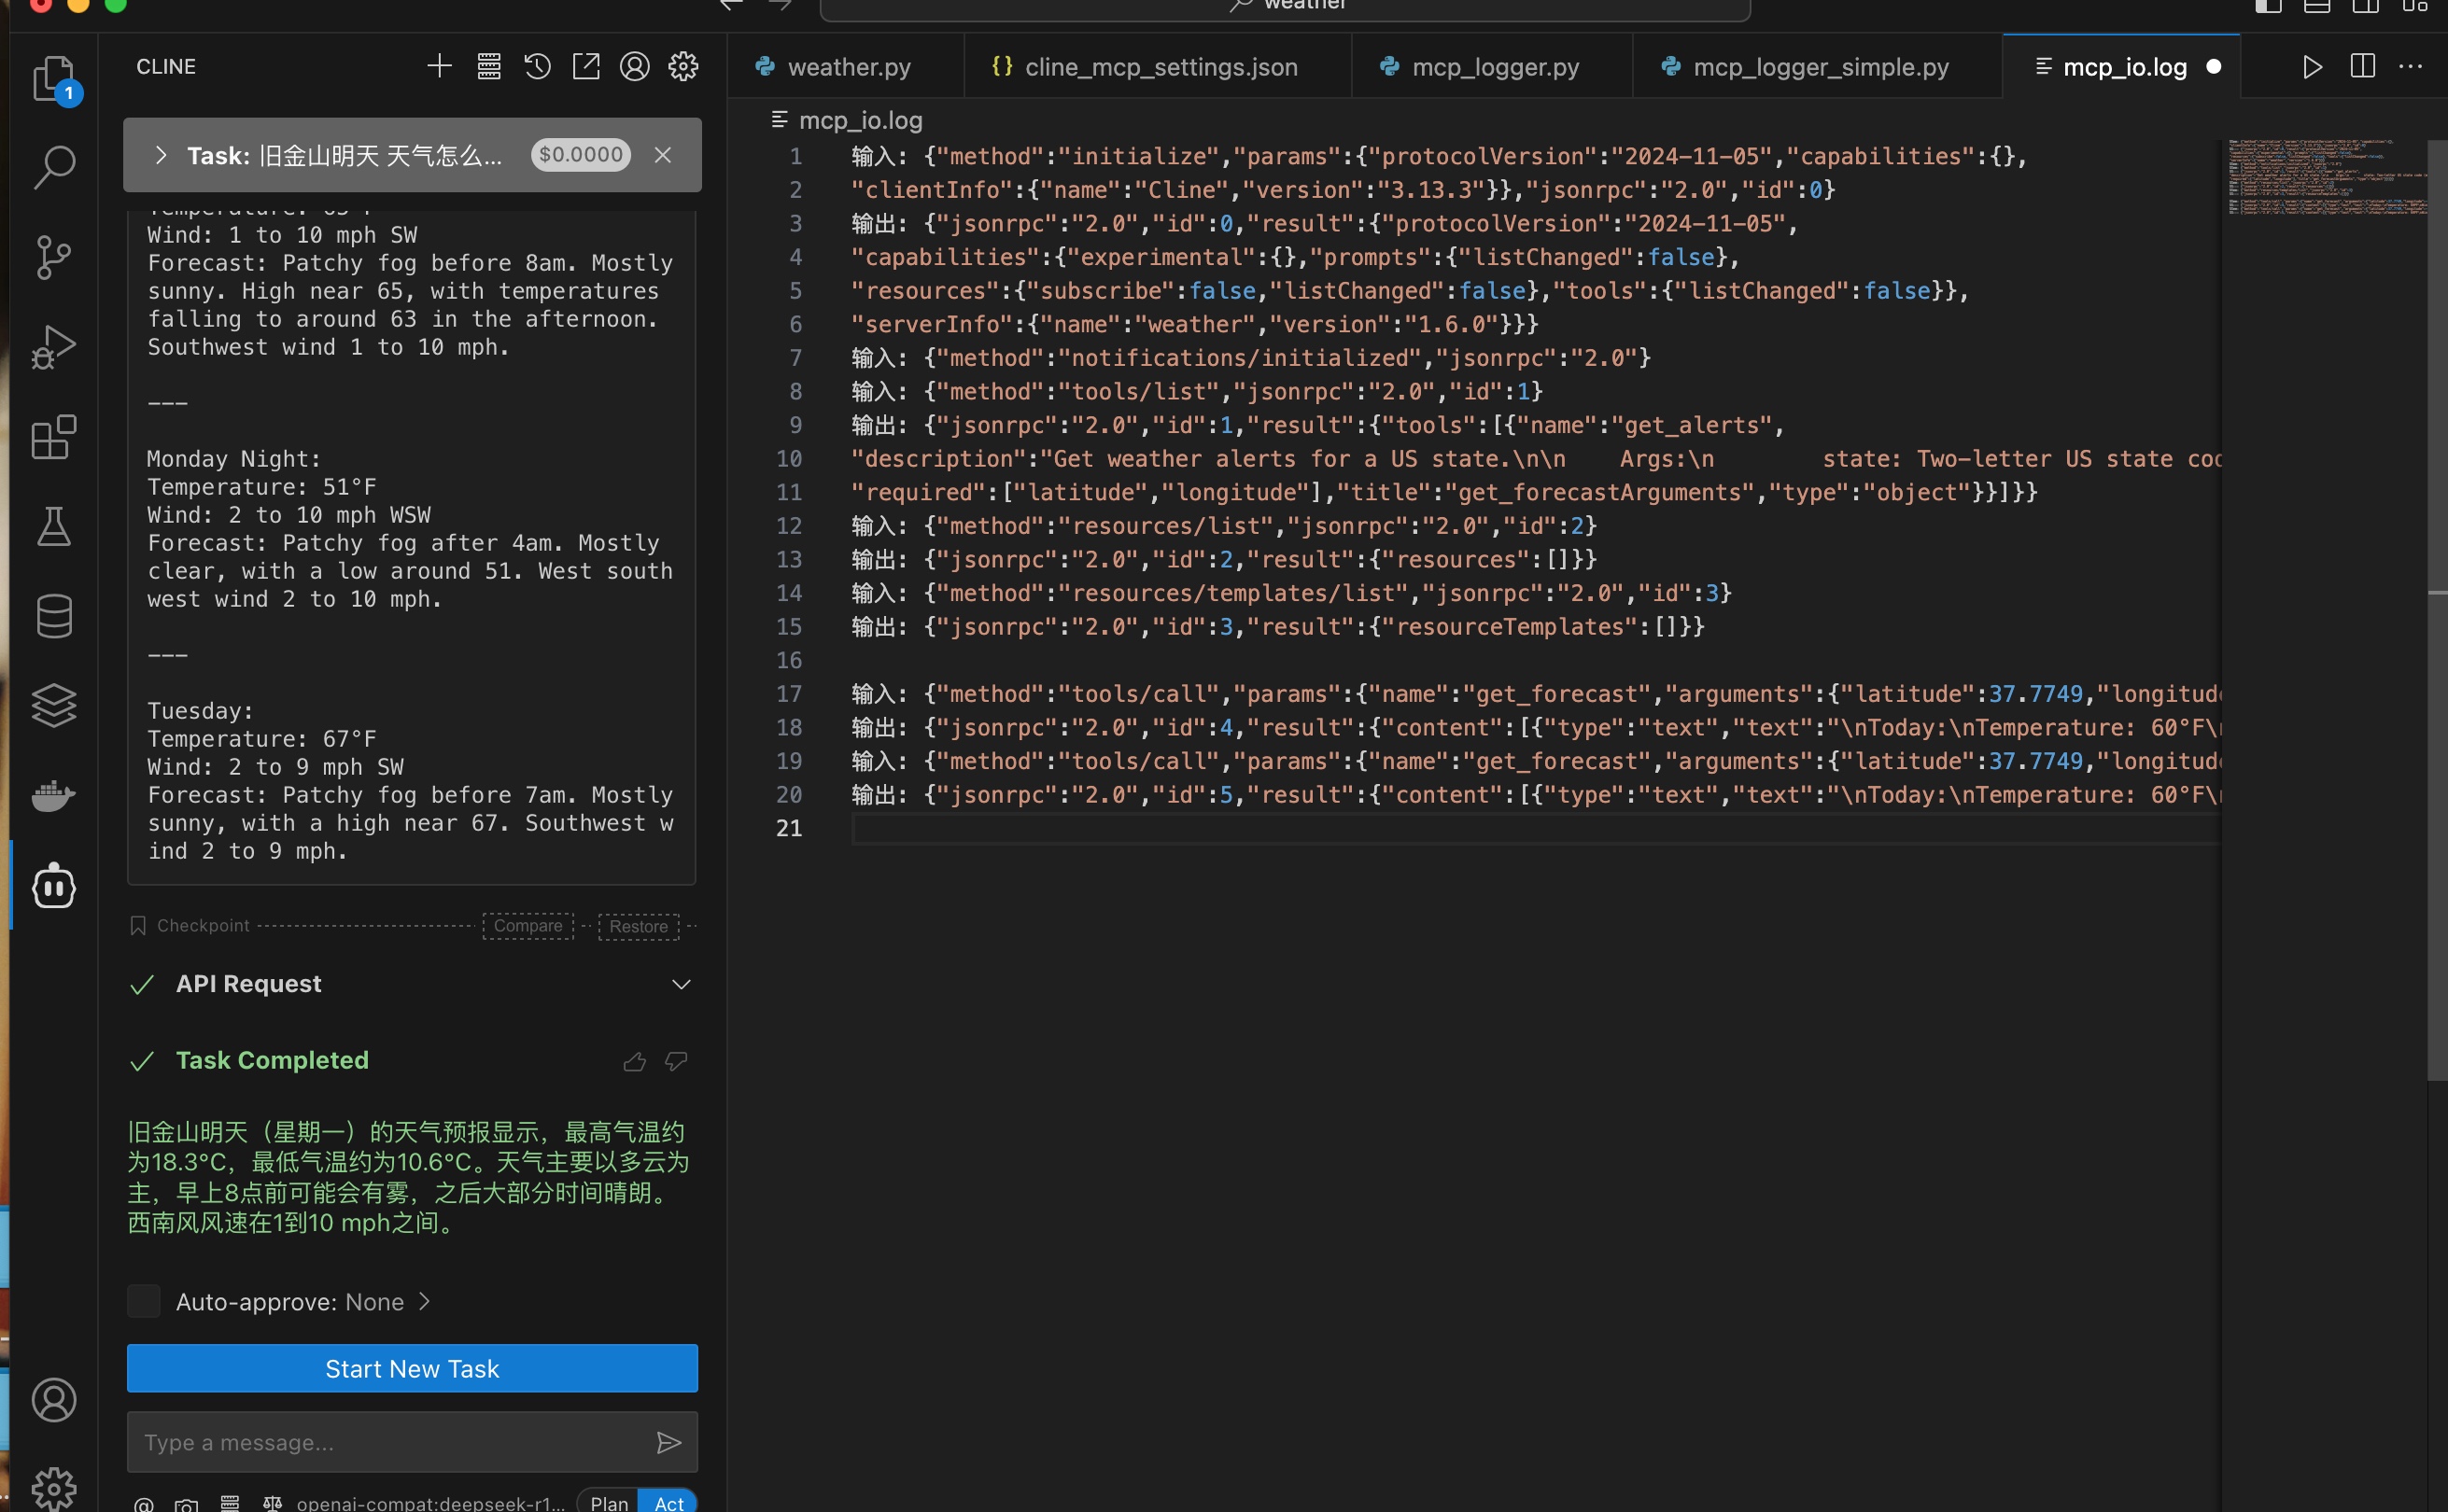
json修改一下

1
2
3
4
5
6
7
8
9
10
11
12
13
14
15
16
17
18
{
"mcpServers": {
"weather": {
"disabled": false,
"timeout": 60,
"command": "/Users/chenyushao/mcp_server/weather/.venv/bin/python",
"args": [
"/Users/chenyushao/mcp_server/weather/mcp_logger.py",
"/Users/chenyushao/.local/bin/uv",
"--directory",
"/Users/chenyushao/mcp_server/weather",
"run",
"weather.py"
],
"transportType": "stdio"
}
}
}

截屏2025-04-27 18.03.53

上面的代码 来自b站作者【马克的技术工作坊

代码来自他的GitHub 仓库 【https://github.com/MarkTechStation/VideoCode/blob/main/MCP%E7%BB%88%E6%9E%81%E6%8C%87%E5%8D%97-%E8%BF%9B%E9%98%B6%E7%AF%87/weather/mcp_logger.py】,在此表示感谢。

在 本文件夹下生成的 mcp_io.log 文件中

1
2
3
4
5
6
7
8
9
10
11
12
13
14
15
16
输入: {"method":"initialize","params":{"protocolVersion":"2024-11-05","capabilities":{},
"clientInfo":{"name":"Cline","version":"3.13.3"}},"jsonrpc":"2.0","id":0}
输出: {"jsonrpc":"2.0","id":0,"result":{"protocolVersion":"2024-11-05",
"capabilities":{"experimental":{},"prompts":{"listChanged":false},
"resources":{"subscribe":false,"listChanged":false},"tools":{"listChanged":false}},
"serverInfo":{"name":"weather","version":"1.6.0"}}}
输入: {"method":"notifications/initialized","jsonrpc":"2.0"}
输入: {"method":"tools/list","jsonrpc":"2.0","id":1}
输出: {"jsonrpc":"2.0","id":1,"result":{"tools":[{"name":"get_alerts",
"description":"Get weather alerts for a US state.\n\n Args:\n state: Two-letter US state code (e.g. CA, NY)\n ","inputSchema":{"properties":{"state":{"title":"State","type":"string"}},"required":["state"],"title":"get_alertsArguments","type":"object"}},{"name":"get_forecast","description":"Get weather forecast for a location.\n\n Args:\n latitude: Latitude of the location\n longitude: Longitude of the location\n ","inputSchema":{"properties":{"latitude":{"title":"Latitude","type":"number"},"longitude":{"title":"Longitude","type":"number"}},
"required":["latitude","longitude"],"title":"get_forecastArguments","type":"object"}}]}}
输入: {"method":"resources/list","jsonrpc":"2.0","id":2}
输出: {"jsonrpc":"2.0","id":2,"result":{"resources":[]}}
输入: {"method":"resources/templates/list","jsonrpc":"2.0","id":3}
输出: {"jsonrpc":"2.0","id":3,"result":{"resourceTemplates":[]}}
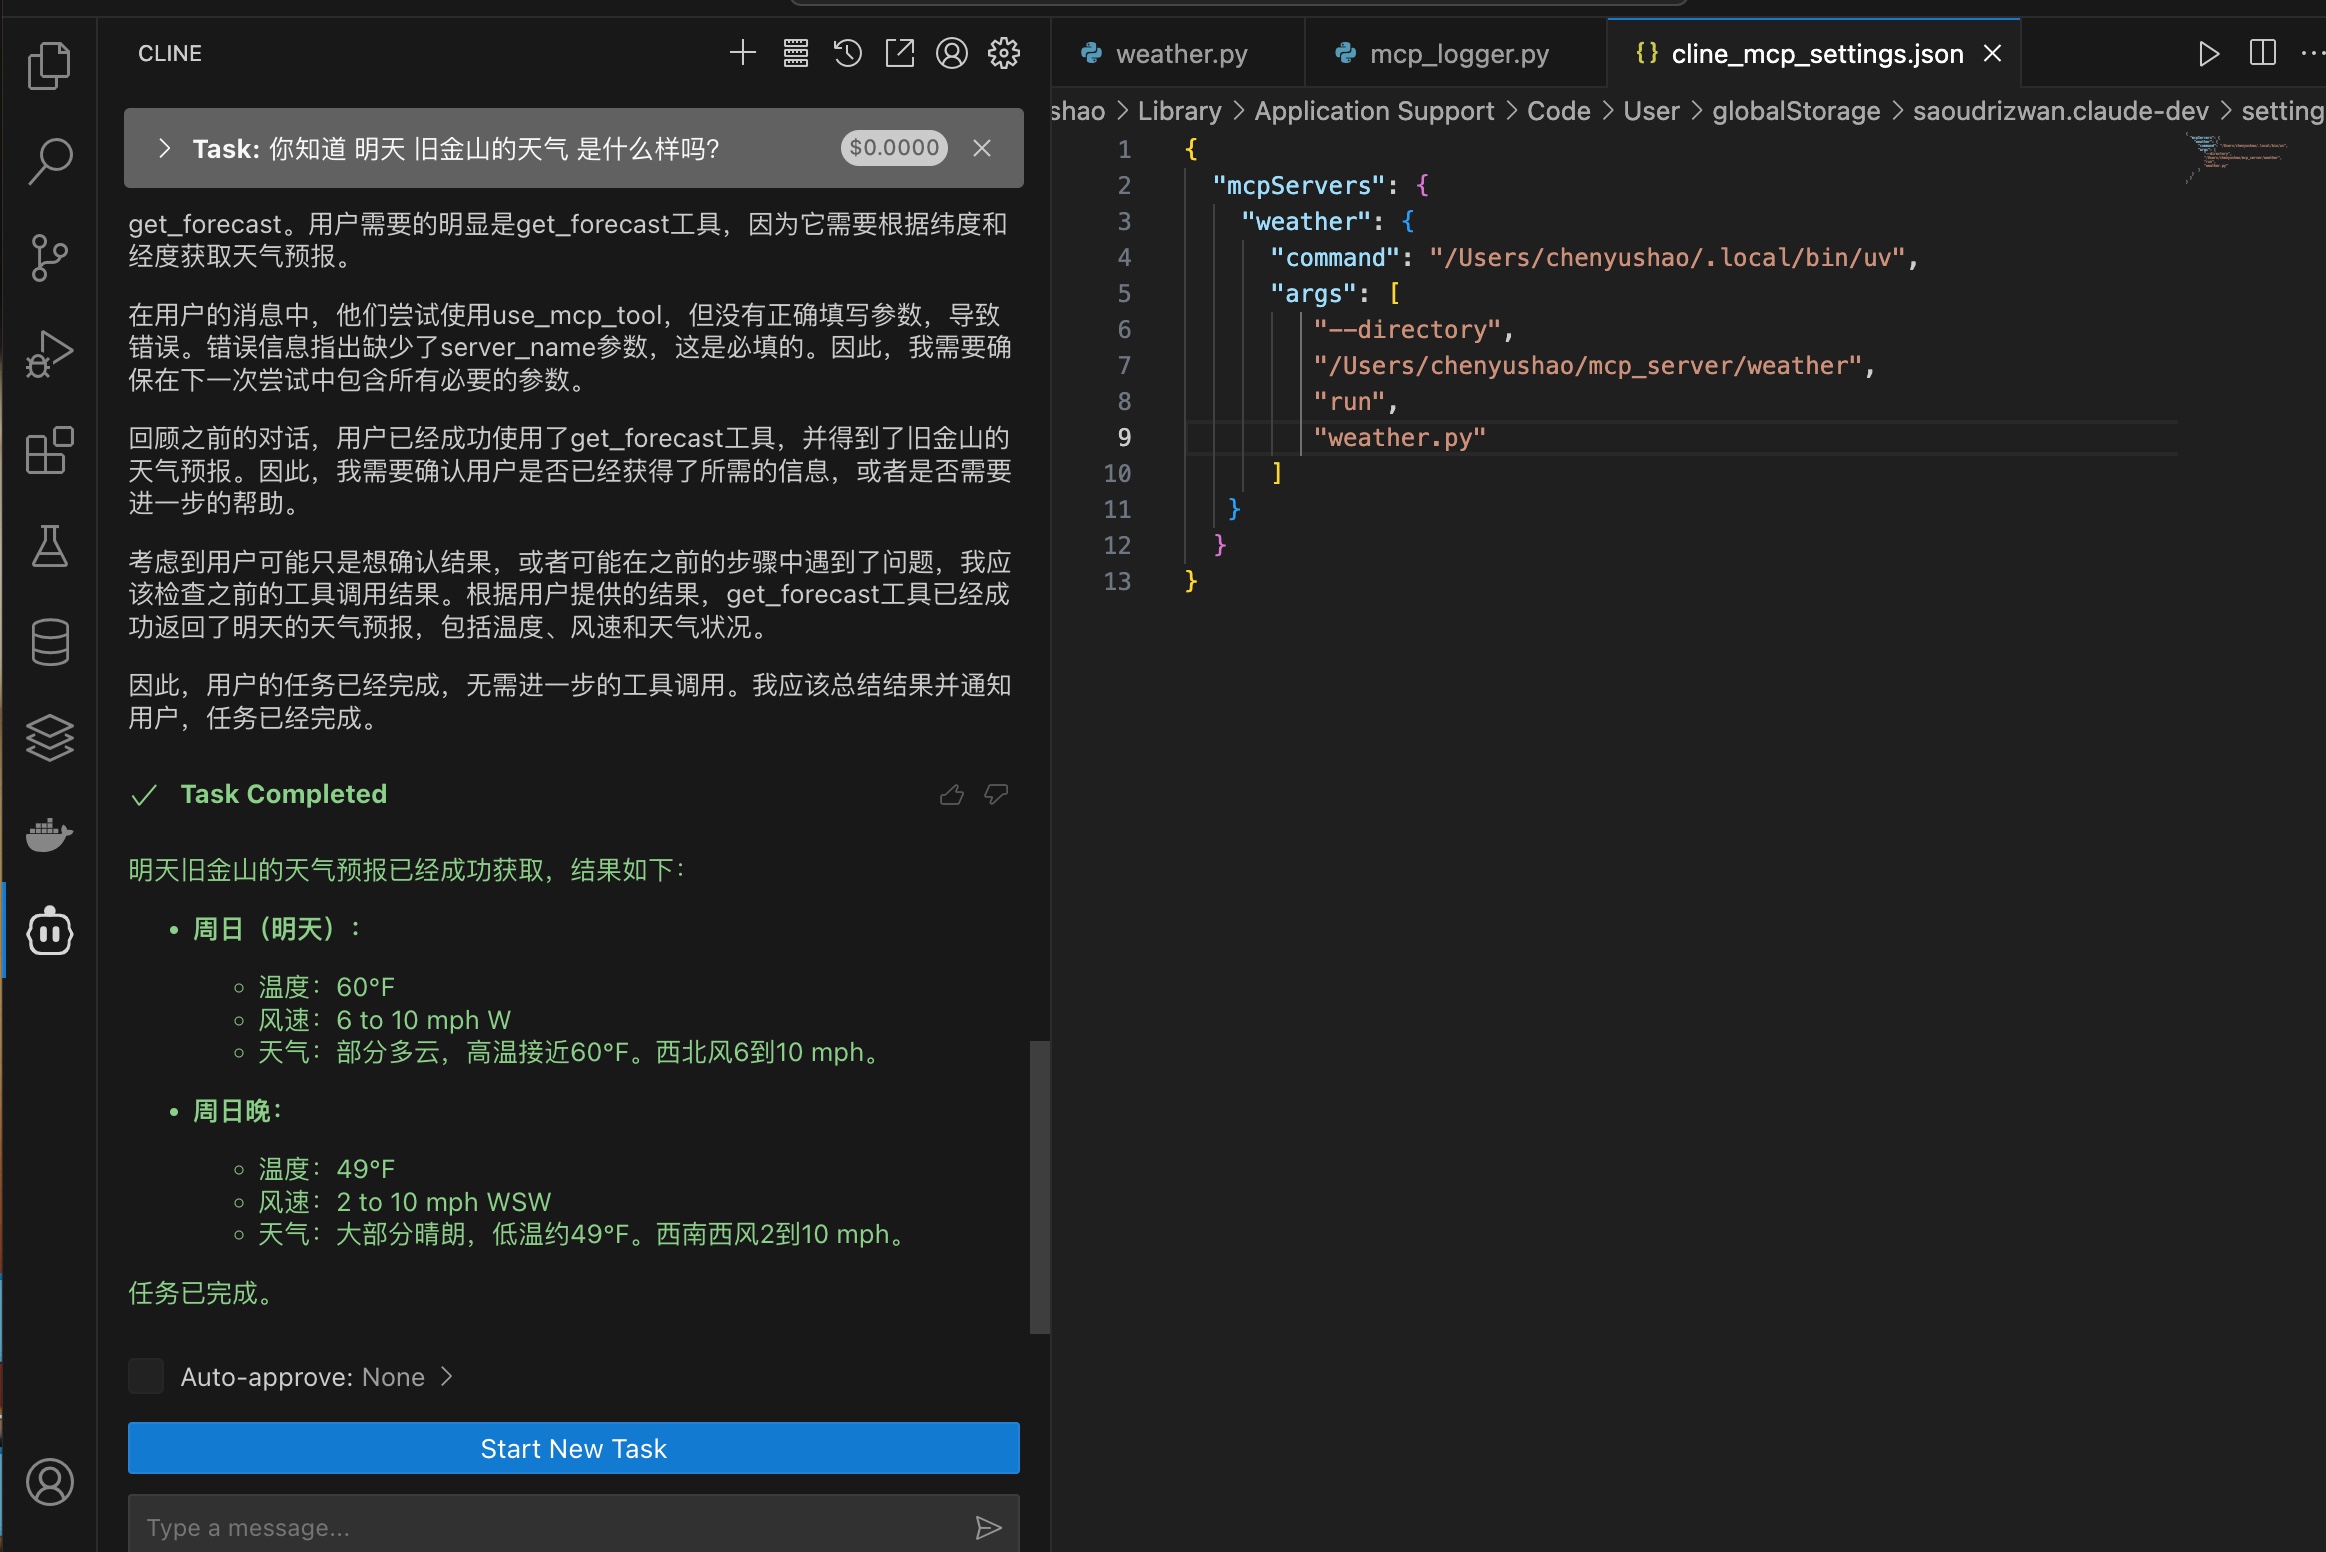
中间一段 mcp server 回复tool 给 mcp host 的 格式展开是这样

1
2
3
4
5
6
7
8
9
10
11
12
13
14
15
16
17
18
19
20
21
22
23
24
25
26
27
28
29
30
31
32
33
34
35
36
37
38
39
40
41
42
43
44
45
46
47
{
"jsonrpc": "2.0",
"id": 1,
"result": {
"tools": [
{
"name": "get_alerts",
"description": "Get weather alerts for a US state.\n\n Args:\n state: Two-letter US state code (e.g. CA, NY)\n ",
"inputSchema": {
"properties": {
"state": {
"title": "State",
"type": "string"
}
},
"required": [
"state"
],
"title": "get_alertsArguments",
"type": "object"
}
},
{
"name": "get_forecast",
"description": "Get weather forecast for a location.\n\n Args:\n latitude: Latitude of the location\n longitude: Longitude of the location\n ",
"inputSchema": {
"properties": {
"latitude": {
"title": "Latitude",
"type": "number"
},
"longitude": {
"title": "Longitude",
"type": "number"
}
},
"required": [
"latitude",
"longitude"
],
"title": "get_forecastArguments",
"type": "object"
}
}
]
}
}

这个 inputSchema内容, 是 weather.py 中 @mcp.tool() 装饰器从tool 方法中提取出来的。

resources文件这些的, 在我们写的mcp server 中不涉及,所以mcp server 反馈为空。

前面这些 log 中的 内容 是 mcp server 连接到 cline 的一瞬间 握手 生成的。

我们现在在cline 中问问题【旧金山明天天气怎么样?】cline 会调用 我们刚刚写的mcp server的工具来试着解决问题。此时我们看看 log 文件中的变化,新增几行内容。

1
2
3
4
输入: {"method":"tools/call","params":{"name":"get_forecast","arguments":{"latitude":37.7749,"longitude":-122.4194}},"jsonrpc":"2.0","id":4}
输出: {"jsonrpc":"2.0","id":4,"result":{"content":[{"type":"text","text":"\nToday:\nTemperature: 60°F\nWind: 6 to 10 mph W\nForecast: Partly sunny, with a high near 60. West wind 6 to 10 mph.\n\n---\n\nTonight:\nTemperature: 49°F\nWind: 2 to 10 mph SW\nForecast: Patchy fog after 3am. Mostly clear, with a low around 49. Southwest wind 2 to 10 mph.\n\n---\n\nMonday:\nTemperature: 65°F\nWind: 1 to 10 mph SW\nForecast: Patchy fog before 8am. Mostly sunny. High near 65, with temperatures falling to around 63 in the afternoon. Southwest wind 1 to 10 mph.\n\n---\n\nMonday Night:\nTemperature: 51°F\nWind: 2 to 10 mph WSW\nForecast: Patchy fog after 4am. Mostly clear, with a low around 51. West southwest wind 2 to 10 mph.\n\n---\n\nTuesday:\nTemperature: 67°F\nWind: 2 to 9 mph SW\nForecast: Patchy fog before 7am. Mostly sunny, with a high near 67. Southwest wind 2 to 9 mph.\n"}],"isError":false}}
输入: {"method":"tools/call","params":{"name":"get_forecast","arguments":{"latitude":37.7749,"longitude":-122.4194}},"jsonrpc":"2.0","id":5}
输出: {"jsonrpc":"2.0","id":5,"result":{"content":[{"type":"text","text":"\nToday:\nTemperature: 60°F\nWind: 6 to 10 mph W\nForecast: Partly sunny, with a high near 60. West wind 6 to 10 mph.\n\n---\n\nTonight:\nTemperature: 49°F\nWind: 2 to 10 mph SW\nForecast: Patchy fog after 3am. Mostly clear, with a low around 49. Southwest wind 2 to 10 mph.\n\n---\n\nMonday:\nTemperature: 65°F\nWind: 1 to 10 mph SW\nForecast: Patchy fog before 8am. Mostly sunny. High near 65, with temperatures falling to around 63 in the afternoon. Southwest wind 1 to 10 mph.\n\n---\n\nMonday Night:\nTemperature: 51°F\nWind: 2 to 10 mph WSW\nForecast: Patchy fog after 4am. Mostly clear, with a low around 51. West southwest wind 2 to 10 mph.\n\n---\n\nTuesday:\nTemperature: 67°F\nWind: 2 to 9 mph SW\nForecast: Patchy fog before 7am. Mostly sunny, with a high near 67. Southwest wind 2 to 9 mph.\n"}],"isError":false}}

我们可见 新增的 从mcp server 输出到 mcp host 的内容严格遵守 前面 握手一瞬间生成的 json 格式要求。

这个格式写法 ,我们就叫它 MCP,model context protocol 模型上下文协议。

截屏2025-04-27 21.39.32

四、跳过MCP Host直接与MCP Server 沟通

不借助MCP Host 根据MCP protocol 规范直接与MCP Server沟通

前面我们已经理解了,其实 MCP 就是一段 MCP Host 和 MCP Server 之间的 输入输出的 json 规范格式而已,那么我们可以 在终端启动 MCP Server ,然后直接以 json 规范格式(MCP格式)来和MCP Host 交互,我们来扮演 之前 cline 的角色。

1
2
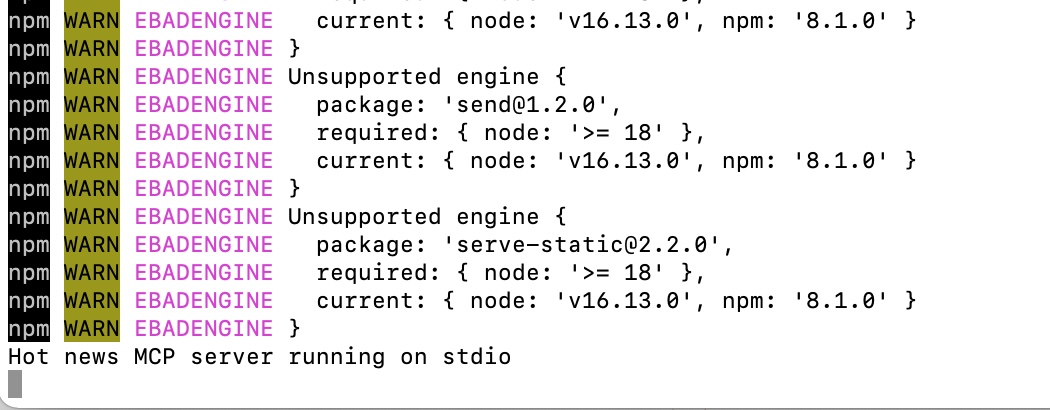
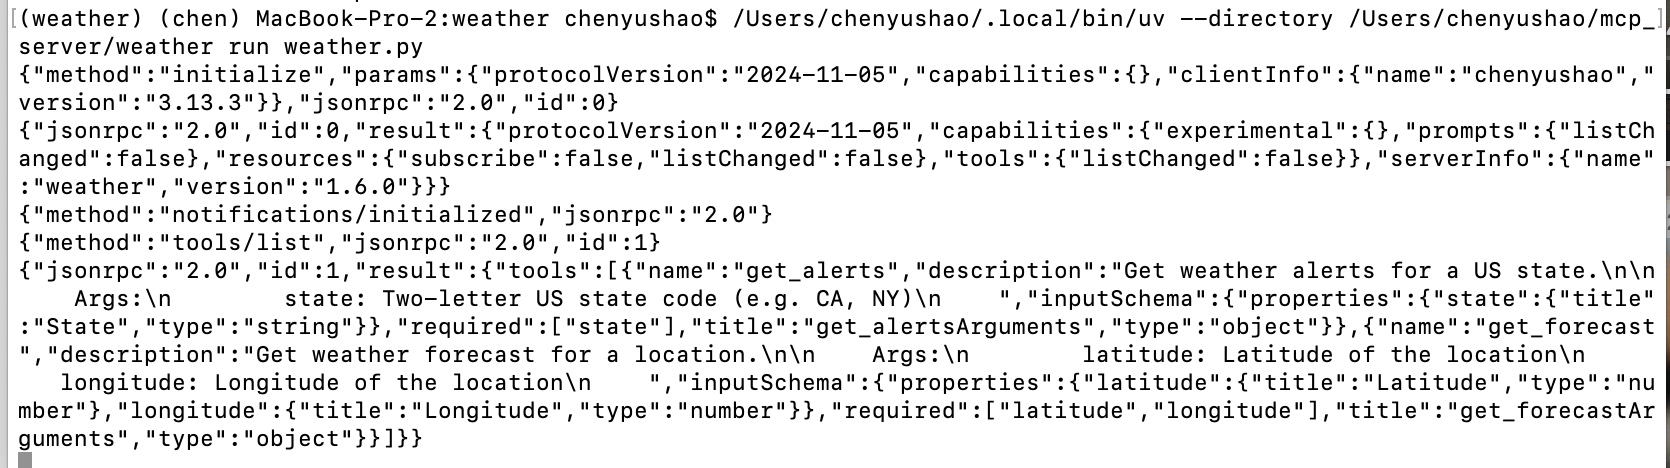
# 先启动 MCP server
(weather) (chen) MacBook-Pro-2:weather chenyushao$ /Users/chenyushao/.local/bin/uv --directory /Users/chenyushao/mcp_server/weather run weather.py

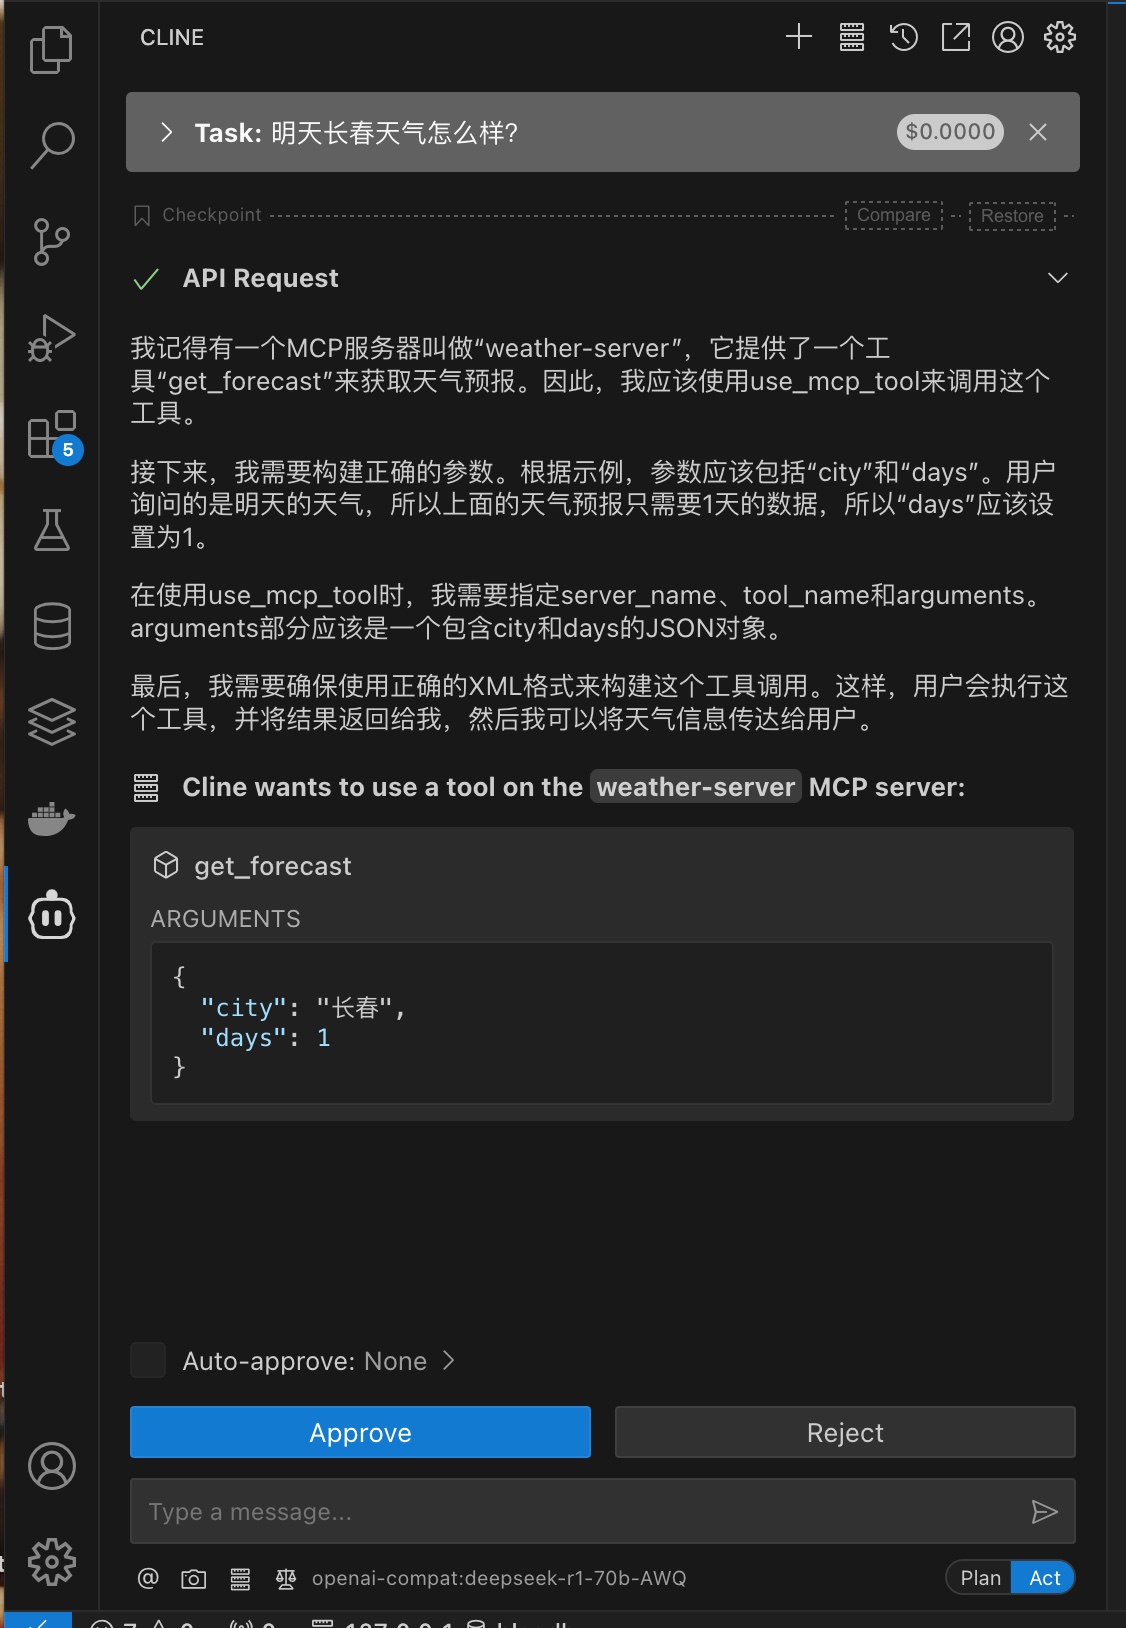
我们用 前文中的json格式,自己改一个 和 MCP Host 交互

1
2
3
4
5
6
7
(weather) (chen) MacBook-Pro-2:weather chenyushao$ /Users/chenyushao/.local/bin/uv --directory /Users/chenyushao/mcp_server/weather run weather.py
{"method":"initialize","params":{"protocolVersion":"2024-11-05","capabilities":{},"clientInfo":{"name":"chenyushao","version":"3.13.3"}},"jsonrpc":"2.0","id":0}
{"jsonrpc":"2.0","id":0,"result":{"protocolVersion":"2024-11-05","capabilities":{"experimental":{},"prompts":{"listChanged":false},"resources":{"subscribe":false,"listChanged":false},"tools":{"listChanged":false}},"serverInfo":{"name":"weather","version":"1.6.0"}}}
{"method":"notifications/initialized","jsonrpc":"2.0"}
{"method":"tools/list","jsonrpc":"2.0","id":1}
{"jsonrpc":"2.0","id":1,"result":{"tools":[{"name":"get_alerts","description":"Get weather alerts for a US state.\n\n Args:\n state: Two-letter US state code (e.g. CA, NY)\n ","inputSchema":{"properties":{"state":{"title":"State","type":"string"}},"required":["state"],"title":"get_alertsArguments","type":"object"}},{"name":"get_forecast","description":"Get weather forecast for a location.\n\n Args:\n latitude: Latitude of the location\n longitude: Longitude of the location\n ","inputSchema":{"properties":{"latitude":{"title":"Latitude","type":"number"},"longitude":{"title":"Longitude","type":"number"}},"required":["latitude","longitude"],"title":"get_forecastArguments","type":"object"}}]}}

和之前日志内容的 一样。我们就这样扮演 MCP Host 角色 和 MCP server 沟通了起来,这个沟通只需要符合 MCP 要求的这样的 json 格式就行,这个格式要求就是 MCP 。

截屏2025-04-27 21.45.43

截屏2025-04-27 21.46.30

MCP 模型上下文协议说的就是 MCP Host 和 MCP server 沟通的专用 json 格式规范而已。至于MCP Host 如何 和 大模型沟通,不属于 MCP协议的范畴。

cline 等等 很多 MCP Host 工具 都有各自 和 大模型交互的方法,这个看他们想法这么搞。 cline 用的是 XML 格式,也有一些家的产品如cherrystudio用的是openai家的 function Calling格式。

MCP 协议 就是 让模型来感知外部环境的协议(感知方法,调用方法)。

截屏2025-04-27 21.53.06

本文绝大多数内容来自 b站作者【马克的技术工作坊】,推荐去关注这个优秀的开发者,再次表示感谢。